 Proudly
Australian
Proudly
Australian


Click on these links for a
"hot lap" of the TZ350 and 250
Website:


Personal Viewpoint:
Turning a stock Yamaha RD 250 or 350 LC into a Forgotten Era race bike
.
This story has been put together to help and encourage guys wanting to get
into "Forgotten Era" class roadracing on a Yamaha RD250 or 350 LC.

Picture:
Brett Metcalfe's RD250LC racer.
Brett has had great success on the bike
winning the South
Australian period 5 State Titles for the past three years in a row,
finishing third in the 2006 Australian Classic
Championship at Mac Park, Mount Gambier, as well as
finishing second in 2007 Victorian Historic Championship for Forgotten Era up to
600cc.
Obviously, some of the
modifications will not be allowed by other country’s Post Classic Racing
governing bodies, but there should still be enough useful information contained
here to assist you no matter where you live and race
Always be aware that modifying a motorcycle, of any type and in any way,
almost always reduces it's reliability.
Do not attempt any of these modifications to a road-going
RDLC or any other motorcycle used on public roads. The improvements are designed
strictly for motorcycles used in closed course roadracing competition.
Remember, motorcycle racing is
dangerous. If you undertake it it is invariably at your OWN RISK !!
Return to the "LC Corner Page"
Read about other guys' race setup tips
Click on the links for information:
Introduction:
Yamaha’s early LC’s are the best road bikes to use to create a Forgotten Era
racer in my opinion. Period.
They are simple, relatively light, handle well and, above all, with the
correct modifications, they are both fast and reliable. If you’re smart, they
can be really cheap to buy and set up, though depending on the level of
development you want to achieve, there can be a hell of a lot of work involved
to reach anywhere near their limit.
Picture: Brian Donovan's LC with grinning son aboard !!

This article was written from a personal viewpoint, using my own experience as the "data-base", as well as
information given by other LC racers I have spoken to. It is by no means the
"be-all to end-all" definative description of how to build an LC racer.
Other guys will no doubt disagree with some of the stuff I've mentioned here.
All I know is all this stuff certainly worked for me. I'm certainly no "guru"
when it comes to LC's, TZ's or whatever, I just like to do things myself and
spend the bare minimum I can.
The main theme of this article is "budget racing". Obviously, if you have
lots of money to waste you can buy everything you need new from Yamaha and have
specialist tuners spend days on your bike. This is something I never did when I
raced LC’s. I always took the cheapest way out and did almost everything to the
bikes myself. It’s up to you, maybe this article will be of no use to you, you
might have money to burn.
It’s divided into separate sections devoted to different aspects of the bike.
Enjoy !!
Top of Page
Chassis:
Have a look at the frame and work out which lugs and brackets
you can afford to lose and which ones will be needed. Things like the lugs for
the stands, the battery holder etc. can usually go, but obviously lugs like
those that mount the radiator etc. need to stay.
Get the white paint and a small brush out, mark the lugs to be sacrificed,
strip the bike back to the bare frame and get the angle grinder out !!
Around 1 to 1.5kg can be saved if you put enough thought and effort into
it. Save all the metal you remove and weigh it all when you’re finished. You
might be surprised !!
Check you swingarm bushes while you’re at it, they’ll more than likely be
seized in there and will need to be broken to be removed.
New ones are available through your Yamaha dealer, but a much cheaper
alternative is to turn some up on a lathe out of nylon bar, which can be
bought from any good bearing service.
Your steering head bearings could probably do with attention as well. Some
guys replace them with tapered needle roller bearings but I never bothered.
Just clean and grease them and stick them back in, unless they are badly
corroded. If they are, once again, go to the bearing service for replacements.
Consider a steering damper if you find you are experiencing disturbing
amounts of headshake. They mount easily to the lower triple clamp and a bolt
welded to the frame.Top of Page
Suspension:
Check your rear shock to see if it’s leaking any oil, or there’s corrosion
on the centreshaft. Most suspension reconditioning companies these days claim
to be able to rebuild any motorcycle shock. Put them to the test if you’re
keen to spend money. As a precaution, ask your friendly Yamaha dealer to check
his "Factory Service" information, if he still has it for the LC. It should
list the standard gas pressure, give this figure to the shock rebuilder, if he
doesn’t already have it.
Aftermarket shocks are available from companies like White Power, Ohlins,
Whitepower, Hagon and Maxton etc. if you are real keen to spend money, but
don’t lose track of the fact that your bike is a 20yo. plus dinosaur and you
are racing in a low cost category of competition. Can you justify the expense?
Don’t forget there’s usually no prizemoney in Forgotten Era racing.
As far as forks go, check for leaks around the seals and replace them if
necessary with cheap, aftermarket seals. Remember, you won’t be commuting
every day on this racer, so you will probably never wear a set of seals out.
Closely inspect the tubes for rust specks and clean these up with fine
"wet and dry" sandpaper, then oil them, let it soak in overnight and clean the
oil off in the morning. This oiling/cleaning ritual will need to be kept up
regularly, every couple of months, or after every time the bike is exposed to
moisture. The other alternative is to track down a pair of tubes that have no
rust and look after them.
Pull your forks right apart and clean everything in kerosene. Check the
free length of your springs and replace if under spec. There are some good
non-genuine springs available for these bikes, check the English bike mags for
ads.
Run 15W oil, at 5mm higher level than stock to begin with and increase
this if you still find you are bottoming out.
In my opinion, patter is the biggest handling problem with LC’s. I have
experienced it at both the front and back ends on LC's !! Play
around with spring rates on the front end, this is usually the source of
patter problems. Riding position can have an effect as well. Even consider "Gold
Valves" from a KX80 ( I think they are the ones that apparently work in
LC forks ) as a last resort, some guys have claimed this improved their patter
problem. But the cheap options
first !!
Oh, and don’t neglect your tyres and make sure they are actually balanced
correctly and round.
You’d be surprised how many top brand tyres for these things aren’t round.
You can make your own "rule-conforming" external pre-load adjusters by
drilling each fork cap and tapping a 6 or 8mm bolt into them, with a lock-nut.
Put 10cent pieces on top of your springs, or a circular piece of metal to give
the adjusting bolt something to press on.
Another good idea is to put an O-ring around one fork tube prior to
fitting the forks back into the bike as a "travel monitor".
Don’t worry about wasting your time with a fork brace, they do virtually
nothing except add unsprung weight in my opinion. If you reckon your forks are twisting
then find wheel bearings with a bigger ID and fit a bigger diameter axle.
Top of Page

Picture: Mark Boddy's LC racers. (
Photo: Mark Boddy )
A hell of a lot of development has gone into these bikes over
the last 5 or 6 years and it has paid off with results for him.
Brakes.
- The biggest , cheap, improvement you can make to an LC’s front brake is to
fit braided line/s. They transform the feel and power of them.
- Pull the whole system apart and clean it all right up with fine "wet and
dry" paper, a tooth brush, and a piece of real fine wire to clean those tiny
little holes out.
- I’ve found that the only paint that seems to stay on brake system
components is heatproof paint, baked in your oven at about 100 deg celcius for
an hour or so.
A word of warning: remove all rubber seals and plastic parts from your
brakes before baking. I left the little window in a master cylinder once and
it turned a lovely golden brown. You have been told.
- Replace any suspect seals. Go to your local brake shop and get them
to try to find something that will fit rather than buy expensive genuine
stuff. You’d be surprised what they can come up with. Failing this, rebuild
kits are available from Yamaha.
- As far as your rear brake goes, pull it all apart and clean and grease the
cam. Also clean up the shoes and drum with fine emery cloth.
- You can drill the rear brake pedal and arm if you’re keen, to reduce weight, but don’t
go too radical, you don’t want them bending.
- Also, replace that tubular steel rear brake "stay" with one made from 20mm
x 4mm or so aluminium.
Top of Page
Wheels.
Check your wheel bearings. If there’s any "notchiness" or "binding" pop
them out of the hubs and clean and grease them. If this doesn’t improve them
then go to your local bearing shop and buy new ones, they are cheap.
I once fitted spoked wheels to one of my LC racers. To be honest they were
almost identical in weight to the stock "mag" wheels and offered no real advantage except to allow wider tyres. But if you can be bothered, old air cooled RD wheels can be made to fit
quite easily.Top of Page
Controls.
Fit "clip-on" handlebars. You can make your own out of steel tube if you
know how to weld well enough. Your master cylinder will sit on an angle and
you will have to lean the bike over to top the oil up but that’s no big deal..
Ditch the stock footpegs and brackets, they scrape on the track all the
time. Get hold of some 10mm aluminium plate and make up your own rearset
brackets using the two bolt mounts on the frame to secure them to the bike. For footpegs, buy some of those "trick" pegs kids attach to the
axles of their BMX bikes. Mount your new pegs and levers to the rearsets using
greased HT. bolts and washers for spacers.
Be careful not to go to radical on the rearset position because they can
induce patter in the bike if they are too "jockey-like". Start with say 60mm
back by 25mm higher than the stock position and work from there. You’ll need
to extend your gearshift lever rod to reach the gearbox rose joint.
Top of Page

Picture: Lech Budniak's two LC racers, NSW Post Classic
Championships, Eastern Creek, 2001. ( Photo: Mark Boddy)
Return to the "LC Corner Page"
Crank.
Pull the top end off the bike and check the conrod side clearance. Also,
after removing the pistons, carefully check the big end wear by delicately
holding the conrod perfectly vertical at BDC and gently twisting it, as well
as trying to move it up and down vertically. No movement is ideal, very,
very slight is ok, but any more means rebuild time. If in doubt, ask an
expert.
Some guys have their cranks welded during a rebuild to prevent them
spreading. I feel this is un-necessary, I’ve rebuilt a few in my time, never
welded one and never had one spread on me. I just use a Loctite on the pins and
check the conrod side clearance after each race meeting.Top
of Page
Engine mods.
( Bet you looked at this section first !! Come on, admit it !!
)
Firstly, check the condition of your top end, ie. clearances, wear,
carbon build up etc. It’s no good modifying a worn motor.
Porting: Get hold of a Dremel or die grinder and carefully raise your
exhaust ports by 1.5mm over stock, checking and measuring constantly.
Remember, there’s no turning back if you take too much metal away. If you’re
keen, polish the exhaust duct (between the bore and exhaust boss.) to help
prevent carbon build up.
While you’re at it, sharpen the bridge between the two transfer entries,
but don’t over-do it and also carefully trim your base gaskets to match the
barrels.
Some two stroke heads even go to the extent of marking the outline of the
transfer inlets on their pistons at BDC and die grind the excess piston skirt
sides away to provide the maximum fuel flow into the transfers. An obvious problem
here is matching piston weights. I really don’t think it’s worth the hassle to
be honest.
Compression: All I ever did with my LC’s compression wise is remove
the head gasket. I can’t recall the figures, but I know it did seem to provide
a noticeable improvement in "seat of the pants" pull out of corners.
When using this method, you need to lap the barrels onto the head by
turning them upside down and using valve grinding paste to ensure a good seal.
To seal them, use plain old Selley’s Silastic. It's cheap and it works.
It pays to keep an eye on squish clearance too. Bend a short length of 2mm
soldering wire at 90 degrees and thread it down through the spark plug holes
so that it touches the bore. Turn the motor over by hand, squashing the wire
between the piston and the head. Measure it, the thickness should never be
less than 0.7 to 0.8mm.
Top of Page
Pistons:
The original Yamaha items are the best, though very expensive, something
like $100 Aus. each or more. You can buy aftermarket pistons from a few
companies which are well worth trying. Wisecos can be used, but being forged
they require a larger piston/bore clearance and a lot of warm up time to be
reliable. Saying that, a lot of guys fit them to TZ750’s with success, but
it's best to stick to cast pistons if possible with LC's.
Some guys enlarge the transfer holes in the back of the pistons or even
cut the back apron right out to
increase flow/ inlet duration. This is a bit risky, obviously it can weaken
the piston and lead to high wear and failures. The best thing to do is just measure the
orifices and ensure that all four ( two pistons ) are identical with a little
light filing.
You can leave the lower piston ring out safely as well to minimize drag on the
cylinder wall.
After each race meeting , pull the top end off the bike ( a 15 minute job,
I’ve timed it) and gently rub any score marks off the pistons with fine "wet
and dry". Marks on the back of the piston can indicate too small a pilot jet,
on the exhaust side, too small a main jet.Top of Page
Exhausts.
If you’re running a 250, get hold of some good race chambers like those
dimensioned below. This is the single, biggest power increase you will get
with these bikes. The stock exhausts are very restrictive.
LC Race Chamber Dimensions.
Below is a layout/cutting list for
race chambers to suit a 250LC.
 (Click on the thumbnail to enlarge the "cutting diagram".)
Please note:
1. You'll notice the stinger section of the table is divided into two sections.
Ignore this and treat it as one length.
2. The stinger length includes
the muffler. For the record, the muffler body itself is 220mm long.
3. The header cone section is
measured from the flat mounting face on the cylinder.
4. They are suited to a 250 LC and would best be described as
"peaky" LC chambers. But saying that, being an LC, the thing was still dead easy
to ride and had heaps more midrange than a TZ.
You’d be amazed how many sizes of main jet you have to go up to compensate
for the improved
breathing. You'll need to run approx. 340 mains in the stock 26mm carbs with
the mods listed in this story.
Top of Page
RD350LC Race exhausts.

Finally we have a design for performance RACE ONLY exhausts to suit the
RD350LC. Sincere thanks go to Greg Sims for providing these dimensions. Greg
actually manufactures exhausts here in Australia so if any of you Aussie LC
racers want a set of race pipes that actually work
contact him via email by clicking here!
Greg's website is located here:
www.kartpipes.com.au
Top of Page
Carburettors
.
The stock 26mm Mikunis are fine for a 250LC. Maybe 28’s, but not much
bigger. For a 350, 28’s or 32’s would be better.
- Powerjet carbs are worth considering due to the fact that they allow more
accurate tuning and help improve top end power as well as reducing the chances
of seizure.
- Flat-slides such as Lectrons are allowed, as long as they are "of the
era". I personally don't believe they offer any significant advantage over round slide Mikunis.
- Running some sort of pod air filters is a real good idea as well, they
extend the service life of your motor a lot.
- As far as synchronization goes, refer to the "TZ Tips" section of the
website for details.
Top of Page
Reed Valves.
Keep a close eye on the condition of your rubber inlet manifolds, hold
them in your hands and bend them slightly, looking for splits and other
damage. The slightest air leak can cause seizure.
File your reed cages out to maximize flow, try to aim for a total
effective area 80% of the carby bore area, ( refer to your better two stroke
tuning books ) but don’t remove the centre rib
unless you are running single leaf reed petals.
Closely monitor all four orifice sizes (two sets of reed valves) and keep
them identical.
"Boyeson" and other two stage reeds are great and definitely help with
midrange, but who needs midrange power on an LC racer? They already have heaps to
begin with. Go for some single leaf, single stage reeds, which allows you to
remove the centre rib of the cages for improved flow.
Bend your reed stops outwards to allow a petal lift of 12mm.
Top of Page
"Boost Bottles"
Never tried them myself, but by all accounts they do actually work, though
apparently the size of the chamber and length of tube is important. Sorry,
I have no information on this. Have a surf on the internet, I’m sure you’ll
find something eventually.
Ignition.
I’ve only ever run the stock LC ignition. You can have the lighting coils
removed if you feel the need, but it’s a bit expensive and achieves little in
the way of acceleration, if anything.
Some guys machine a little off the outside of the flywheel to reduce
inertia and get the motor to spin a little more responsively.
A mate of mine "cooked" a few LC ignitions and ended up drilling
horizontal holes on the ignition cover to allow it to breathe and stay cooler.
He never cooked another ignition, though it was probably more of a coincidence
than anything.
Keep your ignition advance to around 1.8mm BTDC and run B10 or 9EV plugs.
If you have trouble starting the bike then use 8's to get it going and change
over to the colder plugs once it's warmed up.
Obviously you can buy aftermarket ignitions if, once again, you want to
spend some money. I feel they are un-necessary, don't forget your bike is a 20
year old dinosaur.Top of Page
Oil Pump and Kick-Starter:
Remove the pair of them and plug the holes with brass "welsh plugs" from
your local auto spares shop.
Don’t forget to plug the little brass oil inlet tubes in both carbs once
you’ve removed the pump.
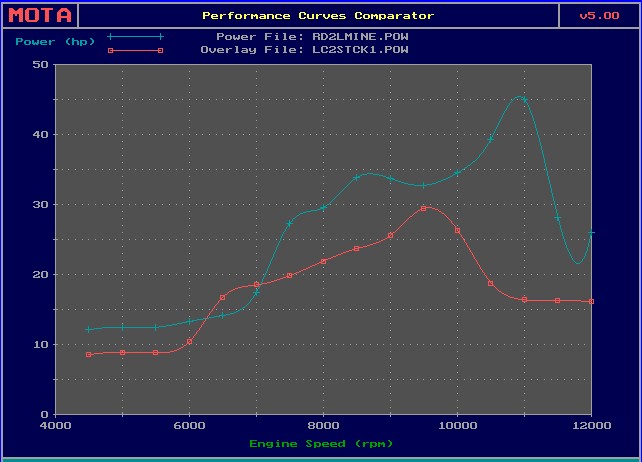
Dyno graph of theoretical power improvement with all the above
modifications:
- Remember, this is just a theoretical indication, but saying that, it
should be in the ballpark compared to actual output, assuming you have your
bike set up perfectly jetting wise etc.

Left is a comparison of power output between a box-stock RD250LC
and one modified in the way described above..
( Click on the thumbnail image to enlarge )
("Muddy" now owns the
bike all this work was done to. You've got yourself
quite a bike there mate !!)
Top of Page
If you have anything to add or dispute, by all means let
us know.
Email the Webmaster
This article is exists for one reason and one reason only, to assist those
guys wanting to convert a stock LC into a racer. Any external help or advice is
most welcome, it can only enhance the story.
Click here for
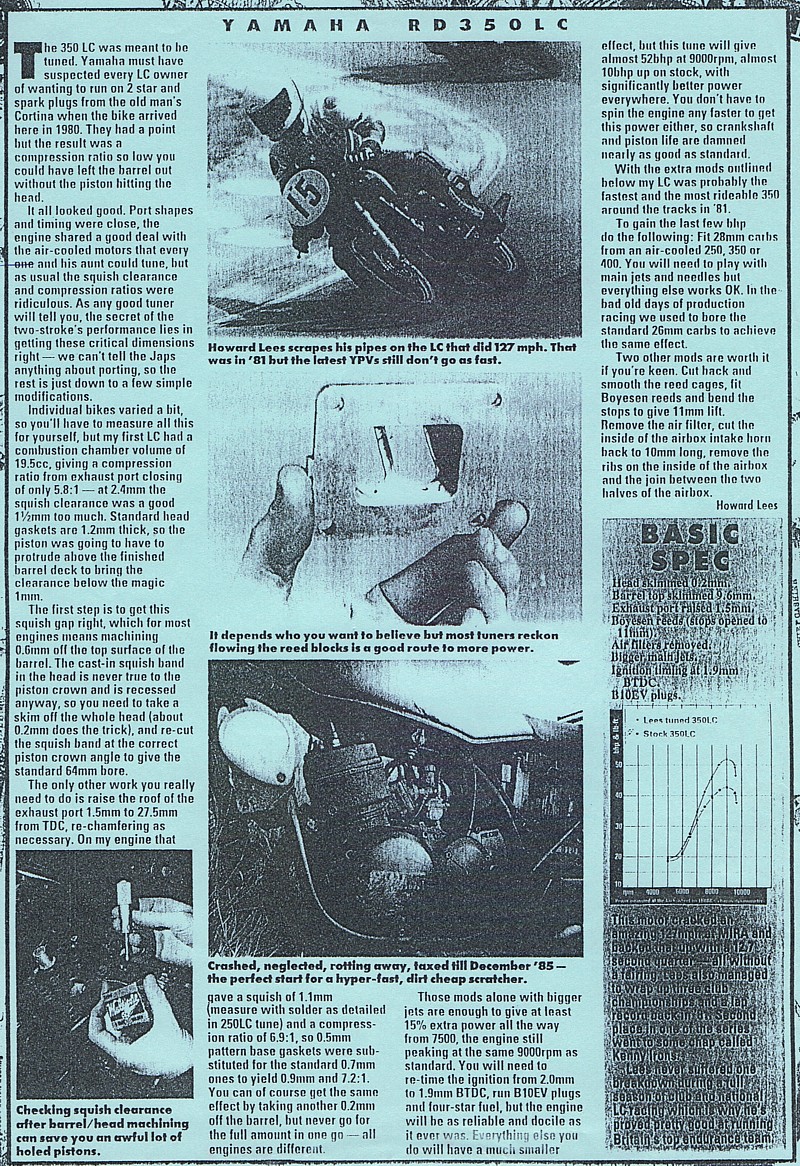
an article on hotting up a 350LC.
Click here for
an article on hotting up a 250LC A lot of the ideas above
cross-reference here as well !!
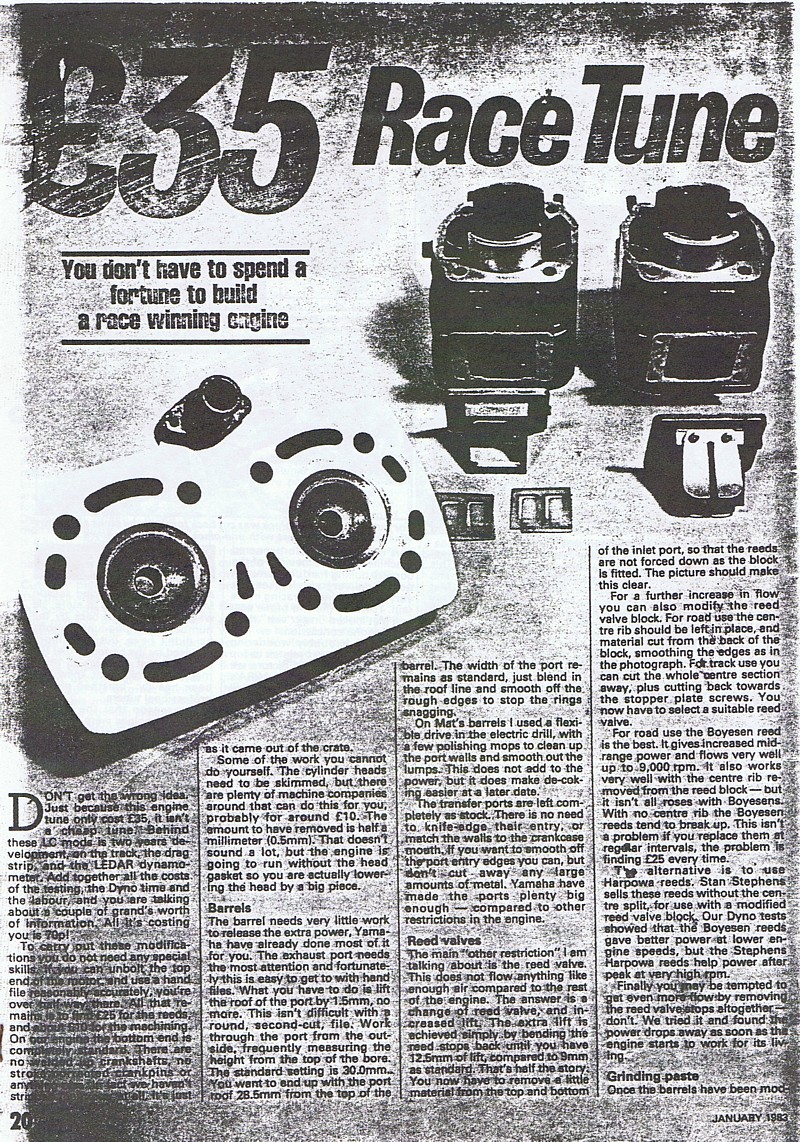
Click here for page 1 of another RDLC performance article.
Click here for page 2,
Click here for page 3,
Click here for page 4 .
Please accept my apologies for the poor quality scans. I can't find the
original articles and could only locate these photocopies to scan. If anyone has
scans of the original documents could they please email them to me and I'll
upload them in place of these hard-to-read documents!
Ever wondered just how fast your LC
racer is going?
Click here for a speed calculation
spreadsheet that you can input your own specific data into...
http://www.tz350.net/ropes_lc_racer_speed_calculator.htm
 Email
the Webmaster
Email
the Webmaster
Top of Page
Return to the "LC Corner Page"
12/04/09 04:23 AM +1000
This article and website © Greg Bennett 2002.

 (Click on the thumbnail to enlarge the "cutting diagram".)
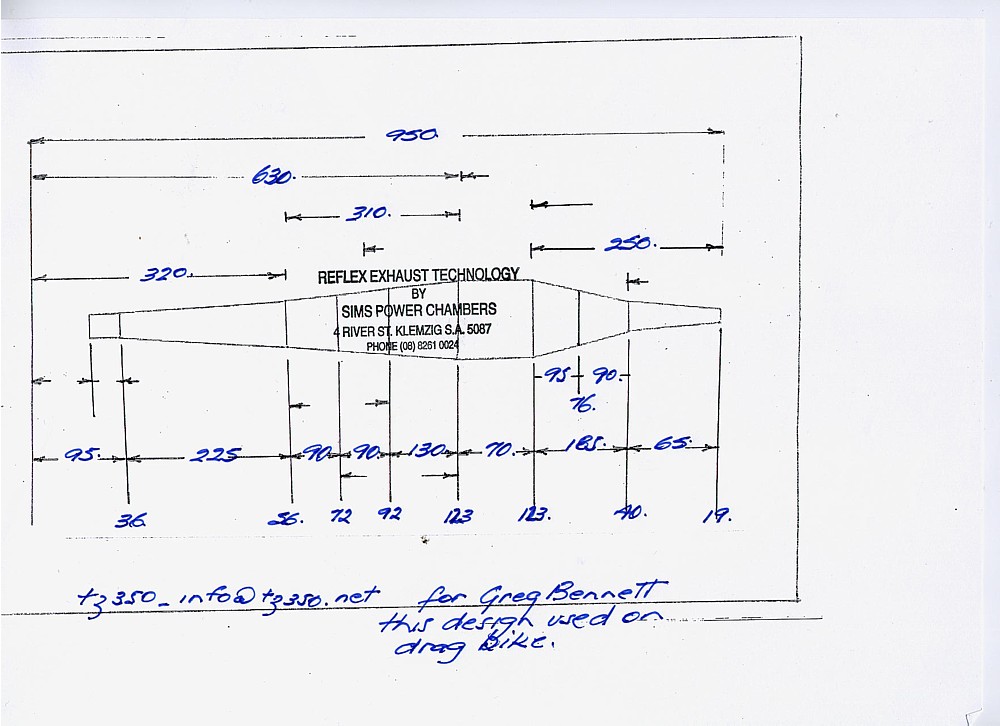