![]()
Click on these links for a "hot lap" of the TZ350 and 250 Website:
![]()
![]()
![]()
![]()
![]()
![]()
![]()
![]()
![]()
![]()
![]()
![]()
![]()
![]()
![]()
TZ Tips (continued).

This submission is not meant to be the ultimate
bible for piston port
Yamaha owners.
Click on these links to access "tips" about the components:
Click here to return to the main TZ Tips page.
F or G model 350 barrels are best, i.e. 6 port. They are easier to ride. If you ride at a really tight track regularly, consider tracking down a TZ700 barrel, which has reed valves and more midrange power.
 Or
even have reed cages fitted to your older piston port barrel as in the
picture (left.)
Or
even have reed cages fitted to your older piston port barrel as in the
picture (left.)
Nikasil coated cylinders last heaps longer than the standard chrome units. Running air filters will extend their life immeasurably. If your Nikasil cylinder is scored give it a light hone. Be sure to thoroughly clean all signs of fine metal particles from the bores before re-assembly using a petrol soaked rag. (Greg Bennett)
Barrels (250)
A through E are different at the bottom of the
transfers. That was when
Yamaha discovered that if the cut the side wall Up
10mm to start the
transfer stream earlier, there was an improvement in
mid range and no
loss at the top. The F took that a step further and
cut away the whole
side (not just the main transfer) which hurt mid
range. They got it
right on the G where the 10mm cutaway was restricted
to the main
transfer and the smaller transfer ports open later.
We're talking 250's
here and the bottom of the barrels.
If you are stuck with a set of early barrels it's not
an problem. Just
open up the bottom of the transfer passageway and get
a good two stroke
tuner to flatten the tops of the transfers so that the
streams collide in
the center of the piston crown, rather than
discharging into the
combustion chamber.
(Richard Nowson)
Consider having a steel ring fitted around
the squish band to help
offset/repair detonation. When thinking about shaving the head, something
worth keeping in mind is the reduced depth of the outer O-ring groove. It
makes it quite difficult to hold the ring in place when assembling the top
end.
General concensus
is that the squish should be kept around 1.8mm.
Put a hose
clamp tightly around the temperature gauge sender flange to help prevent
it splitting when the brass retainer is tightened.
(Greg Bennett)
Squish should be reduced to .80mm or less on a 250 and the
chamber may
need to be trimmed to keep compression within bounds.
Tight squish
equals more mid range, better combustion because of the
increased
turbulence, reduced power loss from unburnt fuel in the
squish area. Refer AG Bell for further details.
The O ring groove must be deepened if you take much off the
head -
remember to leave the "pips" in the groove to hold the ring
in place.
(Richard
Nowson)
Click here to return to the main TZ Tips page.
Keep a close eye on them for stress cracks. Seal them to the cylinders with a suitable product. Even plain old Selley’s Silastic does the job . Use little blobs of the stuff where the pipes rub anywhere on the frame, radiator, on each other, whatever. It will stick firmly to one surface and neatly pull away from the other when pulling the bike down. (Greg Bennett)
I'd like to see dyno results of modern short fat chambers
on early type
bikes - I think it would help. Sealing the head pipe is a
must - not
just to keep the front of the motor clean, but to let the
exhaust work
properly. Hi temp silastic is the ticket. Also make sure
to wire the
pipes on with .032 wire - not .020 . I lost a pipe last
season and when
it blew off, the barrels it snapped the lock wire with
contemptuous ease.
(R. Nowson)
I've found the best way to clean chambers is to use a piece of steel cable, the thickest diameter you can comfortably push down into the exhaust, and a reversable electric drill on a low speed. Be careful as the cable gets near coming out of the pipe though, it flings around a bit. Please be very very careful. Make sure you wear face protection and other appropriate Personal Protection Equipment as required if you decide to try this method. (Greg Bennett)
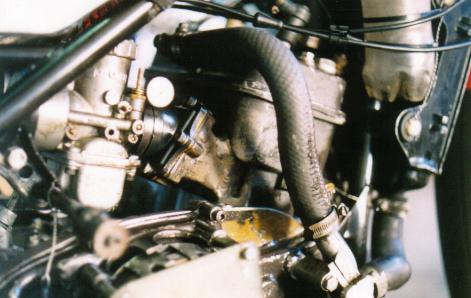
38mm Mikuni Powerjets for a 350 and 34mm Powerjets for a 250 are the best bet. Synchronize the pair as accurately as you can, especially at full throttle.
Air filters really are worth considering. Apart from the obvious reduction in engine wear and chance of damage, they prevent "blowback" out of the bellmouths. The author has yet to notice any power difference in comparison to other competitors on the same type of bike in a race. Maybe a Dyno would tell a different story. (Greg Bennett)
 Lectron. Good reputation. Nothing
practical known.
Lectron. Good reputation. Nothing
practical known.Lectron spares are available through ( an American supplier ).
I just thought
that you should put a warning for people ordering Lectron metering rods
(needles) from ( an American supplier ). They must
specify the length of the rods that fit their carbys
because they are focussed toward the drag racing guys who
normally have much bigger carbys with longer rods.
Also, make sure that they send the parts by air mail
rather than courier or the shipping charges will exceed
the value of the parts. (Mark Boddy)
Click here for a new article about early TZ carburetors from Nick Parkyn.
Click here to return to the main TZ Tips page.
5. Clutch:
Keep the basket slots groove free with a file to ensure a smooth clutch action. There are always stories of the basket securing rivets working loose. Watch them to be safe.
Never let your clutch centre hub get grooves in it like this one.
Both the author's bikes had about 6mm wobble in the clutch basket because bothmale and female splines were badly worn. The wobble was able to be eliminated by pressing a 6005 LU bearing with an aluminium sleeve/spacer pressed onto it's outside, into the basket holder. The sleeve/spacer needs to be an "interference fit" in the basket holder. (It's about 56.1mm OD by 12mm wide and is an interference fit to the outside of the bearing.)
Extra little tip: You might need to heat the basket up in your wife's oven (when she's out shopping) and cool the bearing/sleeve in a plastic bag in the freezer to ensure they slip together easily.
We have heard of TZ owners with-holding tips like the above clutch modification for fear of letting too many others in on it. This is absolute stupidity.
What difference does it make? It's not like it's going to make your bike any faster. It's just going to save you money and heartache. There is far too much secrecy around TZ racing for my liking. All these people harbouring "secrets" are insecure about their own riding abilities !! They need to wake up to themselves and get their hands out of their trousers !!
We all need to "pull together" to help one another keep as many of these great little bikes running as possible.
The center retaining nut needs to be real tight and coated in Loctite otherwise they often come loose.
After each day’s riding slacken your clutch springs off to keep them in good condition.
Check for wear on the actuation lever inside the LH side cover. The bolt hole where the adaptor attaches to the lever itself tends to flog out and fail. (Greg Bennett)
Bronze clutch plates available in UK ( an English supplier ) - apparently more resistant to breakage. Can use them for all the friction plates, though we used them just for the inner two. We broke them all.Barnett in the USA do plates at a better-than-Yamaha price. Haven't tried them. (Kerry Wilton)I haven't bought any recently, so things may have changed, but the older Barnett clutch plate kits used a very thin sheet of aluminium which was inevitably hammered over on the tangs in very short order. The don't break the same way as stock fragile plates, but their ears do get mashed.
Barnett springs are way heavy and dead cheap, so try 3 Barnett and 3 stock. I still have a couple of new sets that I won't use, just taking up shelf space. (Richard Nowson)When you put new plates in, put a mark on the basket where they go and a corresponding mark on the adjacent outer friction plate tab. Number the plates. Do this so that they can go back in the same way - save adjustment and bedding-in problems.Use 3 x 750 springs and 3 x 350. Bit tougher on the hand. Harden up.Have heard that a 'face' type roller bearing can be fitted inside the pressure plate, to bear against the head of the clutch pushrod 'tappet' that pushes the pressure plate out. This is supposed to improve the action a lot. Have yet to try it.Keep the inner nut tight. Having the clutch fall off is inconvenient, damages things and could hurt! Use Loctite and check it often. Use the bell washer under the nut. Have seen many come loose, even when they were near-new.If the basket has been 'dressed' number of times to get rid of the individual grooves left by the plates, for a smoother take-up, some will take the strain from the plate before others - breaking the plates. Plates are expensive - suggest getting a new alloy basket from UK - about 100 pounds. Clutch will be smoother and won't brake plates - paying for itself. We have seen pieces of broken plate nearly destroy the basket anyway, and hit the rider's leg on the way out! (Kerry Wilton)A tip: In order to stop the clutch plates of the TZ250 braking or hammering grooves in the outer clutch drum and clutch centre. Fit the primary gears of the TZ350, you should have to alter your secondary gear ratio of course. We used this in our bikes during the 1975/76/77/78 Dutch Championship season in Holland (Rider Kees v.d. Kruijs). We had many road circuits with tight bends at the time a real disaster for clutches. The clutch plates lasted one season without any problem! Of course at the time I had not told anyone and as we had many poles (and wins) other riders came to look for the gearing we used. You can imagine what happened when they used the same gearing as we did. It took them two seasons to find out!!! (Ferry Brouwer)
RG500 Clutch Conversion: Some guys use a conversion which allows the use of RG500 race bike clutch plates. In a RG500 the plates are made of thin steel with a coating of bronze, this coating apparently almost never wears out.
Some tuners have managed to reduce the plates required for a 350 to 4 friction using TZ750 clutch springs so the weight can be reduced.
The inside diameter of the RG plate is slightly smaller than the TZ350 clutch centre hub so by machining 1.5mm from the inside of the plate they will fit over the centre hub no problem.
The big job is making the outer drum which has to fit the standard TZ splined drive plate for the primary gear and accept the RG friction plate. It can be machined from solid and if done this way can be used for years before beginning to show serious signs of wear. The only maintenance usually required is a once a season rub down on a face plate using 600 grit wet or dry paper to keep the plates gripping.
Fit 'em and forget 'em no more broken plates (almost) ever. (Paul Allender)
Third gear (wheel) sometimes has a tendency to fail, but this is the only problem with the gearbox as far as is known. May have something to do with how skinny that particular gear is causing it to have more of a tendency to wobble on the shaft (input on this anyone?). When it fails it usually takes third gear "pinion" with it.
Use a reputable gearbox oil, change regularly.
Some owners put "teflon"
oil additives in to help reduce wear. Run a minimum of 1,200cc of oil. 1,500cc
is ideal.
Filling it with
the Yamaha recommended 1700cc can lead to leakage.
(Greg Bennett)
Shimming the
gears: I normally take
all the sideways play out of the "wheel" gears and also make sure that there
are no bad scuff marks on the selector forks, you will find that the "wheel"
gears only engage in one direction so I favour that side when taking up the
play. Then put the shafts in the bottom crankcase half and work the gears to
make sure that they are engaging properly, simple.
(Rob Hinton)
More Shimming info: Transmission spinning gears should have
from .003" to .005" side play (clearance). Less than that and they may bind on
the shaft; more and the gear may not engage with the sliding gear. Normally,
the only shaft that needs shimming is the drive gear shaft. The clutch shaft
sideplay is mostly removed when the clutch is tightened on the shaft.
These gears should have 50 to 75 percent of engagement of the dogs in the gear
slots/holes. Less than that may cause damage to the mating surfaces or break
the dogs.
The clutch shaft bearing circlip should be 1.6mm thick, not 1.4mm. The thinner
circlip increases sideplay which will cause a loss of clutch free play and a
tendency to jump out of fourth or fifth gear. Check clutch free play on the
road with the engine pulling. If clutch free play diminishes when the engine
is under load, a thicker circlip is required.
Shim part number and sizes:
156-17417-00-01 (02m etc) 25mm ID, 31mm OD, .02mm thick.
137-23145-01-00 Identical to above shim.
328-17427-00-03 20mm ID, 31mm OD, .03 thick.
The above information was obtained from Motorcycle Service News, Yamaha
International Corporation dated 1-15-71. I have found it difficult to find the
thinner shims. ( Lyn Garland )
Click here to return to the main TZ Tips page.
Sick of your waterpump being ground away after each crash? Make up a guard out of aluminium angle, utilizing the bolts holding the pump together to secure it.
 ( Have another look at the clutch photo.)
Run big K&N air filters on a 350, along with in-line fuel filters. Your motors will last for many many races. A lot more than when not running filters. If you're pressed for space, use foam Unifilters.
They say that it’s sunlight and air that make your tyres harden in the off season. Make up a pair of covers for them out of old inner tubes. Simply cut right around the inside of a tube then stretch it around the tyre on the bike. You can still wheel the bike around ok, it extends the “shelf life” of your tyres. (Greg Bennett)
Fuel and oil
Motul is good oil and so is Silkolene. Castrol
A747 is arguably
slightly better but not measurable. Fuel is always
an issue. Any old TZ
needs a good race gas and if it's been tweaked it
needs better gas.
Problem is that many of the 4 stroke race fuels burn
too slowly or too
fast. A great place to start is VP C12. If you
suffer detonation and
everything else is OK, then try C14. We ran that in
a 90HP 250 Rotax
powered Aprilia a couple of years ago with no
problems. Sunoco purple is
good, as are the mega fuels like VP MR 3+, Nutec
etc.
Couple of things to keep in mind, generally the
higher the octane number,
the less power it makes, and all race fuels are
highly poisonous so treat
them with a great deal of respect.
(Richard Nowson)
 Do not EVER
turn over a flooded bike on rollers. Do not
think about doing it. If there is much fuel in
the bottom end, the fuel comes up the transfers
in such volume that it creates a hydraulic
lock. If you are lucky the rod bends and you
can feel the tightness. If you are unlucky, the
rod has less of a bend and when it fails, and it
will fail, it takes out the crankcases with it.
How do I know? yes, I rebuilt the same motor
two race weekends in a row with bent rods.
Do not EVER
turn over a flooded bike on rollers. Do not
think about doing it. If there is much fuel in
the bottom end, the fuel comes up the transfers
in such volume that it creates a hydraulic
lock. If you are lucky the rod bends and you
can feel the tightness. If you are unlucky, the
rod has less of a bend and when it fails, and it
will fail, it takes out the crankcases with it.
How do I know? yes, I rebuilt the same motor
two race weekends in a row with bent rods.
So how do you clean the motor out. As
suggested, throttle wide open and push - you
cant bend the rods that way and the exercise
will be good for you. You may be surprised to
see how much raw fuel spews out of the
mufflers or pipe joints when it fires up, so
keep a fire extinguisher handy
The cure. All the things suggested, but add a
pair of 5/16 inch quick disconnects, and always
disconnect them every time you come in form a
race. (Richard
Nowson)

The Webmaster's TZ250 C.
When trying to track down TZ parts through Yamaha it is good to check their Motocross parts. The old silencer silentblocks of the TZ's can be replaced by part number 483-14781-02, which is the same. The seal, guard (chain protector) of the old TZ's can be replaced by a modified YZ protector (they have to be cut as the swingarm has a much larger diameter and they are a screw-on type) (Ludy Beumer)
The rear shock of a TZ 250/350 appears to be identical to older YZ monoshocks. I can't comment on damping characteristics, or exact dimensions, but I saw one recently and thought it looked the same as the ones on my TZ's. (Greg Bennett)
Starting. Rollers are not required on any of our TZ's. They will always fire up in a couple of quick steps. If your TZ isn't starting, then it's time to check it out very carefully. Could be the timing is too far out or slow jets are way out of spec, or you may have some sort of air leak. It's possible that the slow coil in the Hitachi has died or maybe you are riding it hard and putting it away too wet, so that it is partly flooded when you try again. (Richard Nowson)
Rear Engine mounting: It's best
not to use the top, rear engine mounting, as it has a tendency to
break the mounting lug off, taking a lot of the gearbox top with
it. There is no harm in running without the top rear
mounting as long as the motor is rubber mounted below, but saying
that, rubber mounting the lower rear mount is nice but not
essential. If the engine IS rubber mounted at the bottom
rear DO NOT use the top rear mount. (also, if the engine is
rubber mounted at the rear, and even if it's not, really) use an
earthing lead from the engine to the frame somewhere to help the
ignition - see the comment in the ignition section.
( Kerry
Wilton )
Sprocket bolts and tabs:
Even though you may be using lock tabs on your rear
sprocket, if you haven't swapped sprockets for a while (eg gearing
change), knock the tabs down and re-tension your sprocket bolts.
They can fret and work loose without coming undone. 18-20 ft lbs
is plenty of tightening torque. High tensile cap screws can be
quite brittle and would need 45 ft lbs to carry the load correctly
which is a lot of torque to apply to a bolt in a magnesium hub..
Standard high tensile bolts (marked 8.8 on the head) should be
more than enough (if at the right tension) for the application, if
you are not using genuine bolts.
Don't use zinc plated bolts as the plating interferes with the
torque loading - causes more friction when tightening up and less
force goes into the actual bolt tension.
It's a good idea to lock-wire the bolts and then get a open end
spanner on them to check
between races to make sure they are still at least "tight".
( Alistair Wilton )
Fitting a 350 top end to a 250 bottom end:
When doing this common modification always ensure you change the 8
cylinder studs in the crankcase to the longer 350 ones. The 350
ones are 8mm longer and the shorter 250 ones will be damaged if
forced to hold down a 350 top end. ( Pierre
Mazaloubeaux )
The Heidenau 90/90-18 racing tyres (front)
have been tried by some Dutch owners and found to be very
good for their courses. They are just 85 euro to buy and might be
worth considering.
The 4.10 Heidenau rear tyre has also been tried and is not so
good.
( Martijn Stehouwer )
Click here to return to the main TZ Tips page.
03/23/08 10:26 AM +1000
This website © Greg Bennett 2002.

 2.Heads

